Case Study - k近傍法
Case Study - k近傍法
第三章で学んだk近傍法に対する以下のケーススタディをまとめてあります。
- カテゴリカルデータ(アンケート)を用いたケーススタディ
- プロダクトメトリクスを用いた欠陥予測(vs ロジスティック回帰分析)に関するケーススタディ
- 分類結果を可視化して確認するケーススタディ
- kの値を変化させた場合の分類境界を可視化して確認するケーススタディ
- データフレーム
Packages and Datasets
本ページでは以下の追加パッケージを用いています。
| Package | Descriptions |
|---|---|
| class | Functions for Classification |
| gmodels | Various R Programming Tools for Model Fitting |
| caret | Classification and Regression Training |
| e1071 | Misc Functions of the Department of Statistics, Probability Theory Group (Formerly: E1071), TU Wien |
| FNN | Fast Nearest Neighbor Search Algorithms and Applications |
| iBreakDown | Model Agnostic Instance Level Variable Attributions |
| kknn | Weighted k-Nearest Neighbors |
| skimr | Compact and Flexible Summaries of Data |
| tidyverse | Easily Install and Load the ‘Tidyverse’ |
利用しているデータセットは各セクションで確認してください。
DSPA HS650, University of Michigan
Data Science and Predictive Analytics (UMich HS650) のケーススタディです。本ケーススタディでは学生の飲酒や家庭環境などと学業成績がどのような関係にあるかを分類するものです。データなどは 3 Case Study から入手することが可能です。
Collecting Data
データはCSVファイルで提供されていますが、区切り文字がカンマでなく空白ですのでread.csv関数を用いるのが無難です。
データは全て数値データですがidは単なる識別番号なのでトレーニング(学習)やテスト(分類)には利用しませんので外しておきます。
実際にはアンケートで取得したデータのようで各値は離散値になっています。
| feature | 内容 | 取りうる値 |
|---|---|---|
| id | インスタンスの識別子 | N/A |
| sex | 性別 | 1: male, 2: female |
| gpa | (米国の)成績評価値の平均 | 0: A, 1: B, … 5: F(不可) |
| Alcoholuse | 飲酒頻度 | 0: drink everyday, … 11: never drinked |
| alcatt | 家庭における飲酒許容 | 0: approve, … 6: disapprove |
| dadjob | 父親の就業 | 1: yes, 2: no |
| momjob | 母親の就業 | 1: yes, 2: no |
| dadclose | 父親との親密度 | 0: usually, … 7: never |
| momclose | 母親との親密度 | 0: usually, … 7: never |
| larceny | $50以上の窃盗行為 | 0: never, … 4: many times |
| vandalism | 破壊行為 | 0: never, … 4: many times |
Exploring and preparing the data
性別と親の就業状況を0/1に変換します。
(df <- x %>%
  dplyr::mutate(sex = sex - 1L,                 # 0: male, 1: female
                dadjob = -1L * (dadjob - 2L),   # 0: nojob, 1: has job
                momjob = -1L * (momjob - 2L)))  # 0: nojob, 1: has job
Normalizing Data and Data preparation
まず、各フィーチャーの最小値が0、最大値が1となるような正規化関数を定義します。これは第三章の実例と同じ考え方に基づくものです。
normalize <- function(x = NULL) {
  if (!is.null(x)) {
    return((x - min(x)) / diff(range(x)))
  } else {
    return(NA)
  }
}次に定義した正規化関数を用いて対象データセットの各フィーチャーを正規化しトレーニングデータとテストデータを作成します。ただし、idは前述のように単なる識別情報でトレーニングには不要ですので外しておきます。
# Traning Data
(df_train <- df %>%
  dplyr::select(-id) %>%
  dplyr::mutate_if(is.numeric, .funs = normalize) %>%
  dplyr::slice(1:150))
# Test Data
(df_test <- df %>%
dplyr::select(-id) %>%
dplyr::mutate_if(is.numeric, .funs = normalize) %>%
dplyr::slice(151:200))成績での分類を行いますので成績評価であるgpaを(A, B, C)と(D, E, F)の二分割になるようにしてラベルデータを作成します。
# Traning Data Label
(df_train_label <- df %>%
  dplyr::select(gpa) %>%
  dplyr::slice(1:150) %>%
  dplyr::mutate(grade = gpa %in% c(3, 4, 5) %>% as.factor() %>%
                  forcats::fct_recode(below = "TRUE", above = "FALSE")) %>%
  .$grade)
## [1] below above below above below below above below above below below
## [12] above below above above below below above above above below above
## [23] above below above below below above above above above above below
## [34] above above below above below above above above above above above
## [45] above above above above above above below above above above above
## [56] above above above below above above above above above above below
## [67] below above above above above below above above above below above
## [78] above above above above below above above below above above below
## [89] above above above above above above above above above above above
## [100] above above above below below below above above below below above
## [111] above below below below above below above above below below below
## [122] below above above above above above above above below above above
## [133] above below below above above above above above above above above
## [144] above above below below above below below
## Levels: above below# Test Data Label
(df_test_label <- df %>%
dplyr::select(gpa) %>%
dplyr::slice(151:200) %>%
dplyr::mutate(grade = gpa %in% c(3, 4, 5) %>% as.factor() %>%
forcats::fct_recode(below = "TRUE", above = "FALSE")) %>%
.$grade)## [1] below above above above above below above above below below above
## [12] above above below below above above above above below above above
## [23] below above above above above below below above below below below
## [34] above above above below above below below above below below above
## [45] above above above below below above
## Levels: above below
Training a model on the data and Evaluating model performance
class::knn関数を用いてトレーニングを行い、その結果を評価します。なお、k値はインスタンス数の平方根(14.1421356)に最も近い整数を用います。
gmodels::CrossTable(x = class::knn(train = df_train, test = df_test,
                                   cl = df_train_label, k = 14),
                    y = df_test_label, dnn = c("Predict", "Actual"),
                    prop.chisq = FALSE, prop.c = FALSE, prop.t = FALSE)
##
##
## Cell Contents
## |-------------------------|
## | N |
## | N / Row Total |
## |-------------------------|
##
##
## Total Observations in Table: 50
##
##
## | Actual
## Predict | above | below | Row Total |
## -------------|-----------|-----------|-----------|
## above | 30 | 11 | 41 |
## | 0.732 | 0.268 | 0.820 |
## -------------|-----------|-----------|-----------|
## below | 0 | 9 | 9 |
## | 0.000 | 1.000 | 0.180 |
## -------------|-----------|-----------|-----------|
## Column Total | 30 | 20 | 50 |
## -------------|-----------|-----------|-----------|
##
##
Improving model performance
パフォーマンス改善を模索するために各フィーチャーをZスコア化してみます。ラベルデータはそのまま用います。
# Traning Data
(df_train <- df %>%
  dplyr::select(-id) %>%
  dplyr::mutate_if(is.numeric, .funs = scale) %>%
  dplyr::slice(1:150))
# Test Data
(df_test <- df %>%
dplyr::select(-id) %>%
dplyr::mutate_if(is.numeric, .funs = scale) %>%
dplyr::slice(151:200))Zスコア化したデータを用いてトレーニングを行ってみますが、大差はないようです。
gmodels::CrossTable(x = class::knn(train = df_train, test = df_test,
                                   cl = df_train_label, k = 14),
                    y = df_test_label, dnn = c("Predict", "Actual"),
                    prop.chisq = FALSE, prop.c = FALSE, prop.t = FALSE)
##
##
## Cell Contents
## |-------------------------|
## | N |
## | N / Row Total |
## |-------------------------|
##
##
## Total Observations in Table: 50
##
##
## | Actual
## Predict | above | below | Row Total |
## -------------|-----------|-----------|-----------|
## above | 30 | 10 | 40 |
## | 0.750 | 0.250 | 0.800 |
## -------------|-----------|-----------|-----------|
## below | 0 | 10 | 10 |
## | 0.000 | 1.000 | 0.200 |
## -------------|-----------|-----------|-----------|
## Column Total | 30 | 20 | 50 |
## -------------|-----------|-----------|-----------|
##
##
Testing alternative values of k
最適なk値を探すにはe1071::tune.knn関数が便利です。各フィーチャーを正規化したデータを用いてk値の探索(推定)を行ってみます。
Cross validation (CV)
より厳密にk値を求めるのであれば交差検証(Cross Vailidation)を行うべきだと言われています。(勉強中) k値を最も簡単に探索(推定)するにはe1071::tune.knn関数を用います。
##
## Parameter tuning of 'knn.wrapper':
##
## - sampling method: 10-fold cross validation
##
## - best parameters:
##  k
##  6
##
## - best performance: 0.18
##
## - Detailed performance results:
##     k     error dispersion
## 1   1 0.2266667 0.10036969
## 2   2 0.2333333 0.10061539
## 3   3 0.1866667 0.08195151
## 4   4 0.2200000 0.12976712
## 5   5 0.2000000 0.14401646
## 6   6 0.1800000 0.14072125
## 7   7 0.2066667 0.13128049
## 8   8 0.2133333 0.12491973
## 9   9 0.2066667 0.12746338
## 10 10 0.2000000 0.13333333set.seed(seed)
caret::train(x = df_train, y = df_train_label,
method = "knn", tuneGrid = expand.grid(k = c(1:10)),
trControl = caret::trainControl(method = "cv"))## Loading required package: lattice##
## Attaching package: 'caret'## The following object is masked from 'package:purrr':
##
## lift## k-Nearest Neighbors
##
## 150 samples
## 10 predictor
## 2 classes: 'above', 'below'
##
## No pre-processing
## Resampling: Cross-Validated (10 fold)
## Summary of sample sizes: 135, 135, 135, 134, 136, 136, ...
## Resampling results across tuning parameters:
##
## k Accuracy Kappa
## 1 0.7714286 0.4577017
## 2 0.8391071 0.6136060
## 3 0.8452976 0.5994740
## 4 0.8587500 0.6471180
## 5 0.8324405 0.5398762
## 6 0.8409524 0.5528819
## 7 0.8191071 0.4884061
## 8 0.8266667 0.5099770
## 9 0.8400595 0.5483028
## 10 0.8275595 0.5156497
##
## Accuracy was used to select the optimal model using the largest value.
## The final value used for the model was k = 4.
本Case Studyに対する疑問
本Case Studyでは、GPAを元にした成績評価(above or below)の分類を行うためにGPAの値もトレーニング、テストに用いているが、これはいかがなものであろうか?
試しにGPAを除いてトレーニングしてみると大きく異なる値になることが分かる。
set.seed(seed)
gmodels::CrossTable(x = class::knn(train = df_train, test = df_test,
                                   cl = df_train_label, k = 14),
                    y = df_test_label, dnn = c("Predict", "Actual"),
                    prop.chisq = FALSE, prop.c = FALSE, prop.t = FALSE)
##
##
## Cell Contents
## |-------------------------|
## | N |
## | N / Row Total |
## |-------------------------|
##
##
## Total Observations in Table: 50
##
##
## | Actual
## Predict | above | below | Row Total |
## -------------|-----------|-----------|-----------|
## above | 29 | 20 | 49 |
## | 0.592 | 0.408 | 0.980 |
## -------------|-----------|-----------|-----------|
## below | 1 | 0 | 1 |
## | 1.000 | 0.000 | 0.020 |
## -------------|-----------|-----------|-----------|
## Column Total | 30 | 20 | 50 |
## -------------|-----------|-----------|-----------|
##
## ##
## Parameter tuning of 'knn.wrapper':
##
## - sampling method: 10-fold cross validation
##
## - best parameters:
## k
## 18
##
## - best performance: 0.3066667
##
## - Detailed performance results:
## k error dispersion
## 1 1 0.4533333 0.10327956
## 2 2 0.4533333 0.11243654
## 3 3 0.4400000 0.13407203
## 4 4 0.3866667 0.09322745
## 5 5 0.4000000 0.11758895
## 6 6 0.4200000 0.10446808
## 7 7 0.3800000 0.09454243
## 8 8 0.3600000 0.10976968
## 9 9 0.3466667 0.11243654
## 10 10 0.3400000 0.10634210
## 11 11 0.3400000 0.09660918
## 12 12 0.3266667 0.14555131
## 13 13 0.3400000 0.11525602
## 14 14 0.3333333 0.09428090
## 15 15 0.3266667 0.10159226
## 16 16 0.3400000 0.10634210
## 17 17 0.3133333 0.09962894
## 18 18 0.3066667 0.10517475
## 19 19 0.3066667 0.10517475
## 20 20 0.3133333 0.10446808
## 21 21 0.3066667 0.10517475
## 22 22 0.3066667 0.10517475
## 23 23 0.3066667 0.10517475
## 24 24 0.3133333 0.09962894
## 25 25 0.3066667 0.10517475
## 26 26 0.3133333 0.09962894
## 27 27 0.3066667 0.10517475
## 28 28 0.3133333 0.09962894
## 29 29 0.3133333 0.09962894
## 30 30 0.3133333 0.09962894
欠陥が生じやすいモジュールを予測する
『データ指向のソフトウェア品質マネジメント』 (通称デート本)の第4.3節にある「欠陥が生じやすいモジュールの予測」のデータを用いてk近傍法による欠陥予測をしてみます。ちなみにデート本ではロジスティック回帰分析によるモデルを構築しています。なお、利用するデータはデート本の案内を参考にダウンロードしてください。
因子化と正規化
予測を行う前にで欠陥の有無を表すModify(修正有無)のデータを因子化(ラベル化)し、各数値を正規化しておきます。各変量とも右に歪んだ分布なので、ここでは最小最大正規化を行います。
データの作成
トレーニングデータとテストデータを作成します。対象となるデータのインスタンス数が102ですので、その内、ランダムに選択した\(75\%\)インスタンスをトレーニングデータとし、残りをテストデータとします。
トレーニングと予測
準備したトレーニングデータとテストデータを用いて予測してみます。ここではk値をトレーニングデータの数の平方根(8)としています。
k <- as.integer(sqrt(nrow(train)))
(knn_model <- class::knn(train = train[, -6], test = test[, -6],
                         cl = train$Modify, k = k)) %>%
  gmodels::CrossTable(x = ., y = test$Modify, dnn = c("Predict", "Actual"),
                      prop.chisq = FALSE, prop.r = TRUE, prop.t = FALSE)
##
##
## Cell Contents
## |-------------------------|
## | N |
## | N / Row Total |
## | N / Col Total |
## |-------------------------|
##
##
## Total Observations in Table: 25
##
##
## | Actual
## Predict | FALSE | TRUE | Row Total |
## -------------|-----------|-----------|-----------|
## FALSE | 10 | 2 | 12 |
## | 0.833 | 0.167 | 0.480 |
## | 0.909 | 0.143 | |
## -------------|-----------|-----------|-----------|
## TRUE | 1 | 12 | 13 |
## | 0.077 | 0.923 | 0.520 |
## | 0.091 | 0.857 | |
## -------------|-----------|-----------|-----------|
## Column Total | 11 | 14 | 25 |
## | 0.440 | 0.560 | |
## -------------|-----------|-----------|-----------|
##
## なお、TRUEがリリース後に欠陥修正あり(バグありで出荷)であることに注意してください。
data.frame(predict = as.vector(knn_model),
           actual = as.vector(test$Modify)) %>%
  dplyr::mutate(predict = as.logical(predict),
                notmatch = xor(predict, actual))
交差検証(e1071パケージ)
k値を1~30の範囲でe1071パッケージを使って交差検証してみると最適値は以下になります。
##
## Parameter tuning of 'knn.wrapper':
##
## - sampling method: 10-fold cross validation
##
## - best parameters:
##  k
##  3
##
## - best performance: 0.2607143
##
## - Detailed performance results:
##     k     error dispersion
## 1   1 0.3589286 0.17766636
## 2   2 0.3696429 0.15523052
## 3   3 0.2607143 0.15342832
## 4   4 0.3017857 0.09869112
## 5   5 0.2928571 0.15753019
## 6   6 0.3285714 0.12463097
## 7   7 0.3535714 0.11809140
## 8   8 0.3946429 0.12095203
## 9   9 0.3535714 0.11809140
## 10 10 0.3428571 0.11287573
## 11 11 0.3410714 0.13945604
## 12 12 0.3696429 0.12258148
## 13 13 0.3553571 0.12327322
## 14 14 0.3410714 0.13945604
## 15 15 0.3553571 0.12327322
## 16 16 0.3553571 0.12327322
## 17 17 0.3535714 0.13594383
## 18 18 0.3285714 0.12882471
## 19 19 0.3410714 0.13945604
## 20 20 0.3410714 0.13945604
## 21 21 0.3410714 0.13945604
## 22 22 0.3410714 0.13945604
## 23 23 0.3410714 0.13945604
## 24 24 0.3410714 0.13945604
## 25 25 0.3410714 0.13945604
## 26 26 0.3410714 0.13945604
## 27 27 0.3267857 0.15246696
## 28 28 0.3267857 0.15246696
## 29 29 0.3410714 0.13945604
## 30 30 0.3410714 0.13945604set.seed(seed)
(knn_model <- class::knn(train = train[, -6], test = test[, -6],
cl = train$Modify, k = k$best.parameters)) %>%
gmodels::CrossTable(x = ., y = test$Modify, dnn = c("Predict", "Actual"),
prop.chisq = FALSE, prop.r = TRUE, prop.t = FALSE)##
##
## Cell Contents
## |-------------------------|
## | N |
## | N / Row Total |
## | N / Col Total |
## |-------------------------|
##
##
## Total Observations in Table: 25
##
##
## | Actual
## Predict | FALSE | TRUE | Row Total |
## -------------|-----------|-----------|-----------|
## FALSE | 9 | 2 | 11 |
## | 0.818 | 0.182 | 0.440 |
## | 0.818 | 0.143 | |
## -------------|-----------|-----------|-----------|
## TRUE | 2 | 12 | 14 |
## | 0.143 | 0.857 | 0.560 |
## | 0.182 | 0.857 | |
## -------------|-----------|-----------|-----------|
## Column Total | 11 | 14 | 25 |
## | 0.440 | 0.560 | |
## -------------|-----------|-----------|-----------|
##
## data.frame(predict = as.vector(knn_model),
actual = as.vector(test$Modify)) %>%
dplyr::mutate(predict = as.logical(predict),
notmatch = xor(predict, actual))
交差検証(caretパッケージ)
次にk値を同様の範囲でcaretパッケージを使って交差検証してみます。
set.seed(seed)
(knnfit <- caret::train(x[, -6], as.factor(as.integer(x$Modify)),
             method = "knn", tuneGrid = expand.grid(k = c(1:30)),
             trControl = caret::trainControl(method = "cv")))
## k-Nearest Neighbors
##
## 102 samples
## 5 predictor
## 2 classes: '0', '1'
##
## No pre-processing
## Resampling: Cross-Validated (10 fold)
## Summary of sample sizes: 91, 92, 92, 92, 92, 91, ...
## Resampling results across tuning parameters:
##
## k Accuracy Kappa
## 1 0.6945455 0.3804517
## 2 0.7127273 0.4073158
## 3 0.7427273 0.4700973
## 4 0.7227273 0.4367324
## 5 0.7218182 0.4331148
## 6 0.7318182 0.4671319
## 7 0.7027273 0.4061966
## 8 0.7027273 0.4179915
## 9 0.6927273 0.3828632
## 10 0.6736364 0.3461987
## 11 0.7027273 0.4009792
## 12 0.7118182 0.4196130
## 13 0.7127273 0.4189296
## 14 0.7027273 0.4044368
## 15 0.6918182 0.3844252
## 16 0.7018182 0.3984906
## 17 0.6918182 0.3844252
## 18 0.6818182 0.3673312
## 19 0.6918182 0.3844252
## 20 0.7018182 0.4002982
## 21 0.7118182 0.4147910
## 22 0.7018182 0.4002982
## 23 0.7118182 0.4147910
## 24 0.7018182 0.4002982
## 25 0.7018182 0.4002982
## 26 0.7118182 0.4147910
## 27 0.7118182 0.4147910
## 28 0.7118182 0.4147910
## 29 0.7118182 0.4147910
## 30 0.7118182 0.4147910
##
## Accuracy was used to select the optimal model using the largest value.
## The final value used for the model was k = 3.
class::knn(train = train[, -6], test = test[, -6],
           cl = train$Modify, k = 3) %>%
  gmodels::CrossTable(x = ., y = test$Modify, dnn = c("Predict", "Actual"),
                      prop.chisq = FALSE, prop.r = TRUE, prop.t = FALSE)
##
##
## Cell Contents
## |-------------------------|
## | N |
## | N / Row Total |
## | N / Col Total |
## |-------------------------|
##
##
## Total Observations in Table: 25
##
##
## | Actual
## Predict | FALSE | TRUE | Row Total |
## -------------|-----------|-----------|-----------|
## FALSE | 9 | 2 | 11 |
## | 0.818 | 0.182 | 0.440 |
## | 0.818 | 0.143 | |
## -------------|-----------|-----------|-----------|
## TRUE | 2 | 12 | 14 |
## | 0.143 | 0.857 | 0.560 |
## | 0.182 | 0.857 | |
## -------------|-----------|-----------|-----------|
## Column Total | 11 | 14 | 25 |
## | 0.440 | 0.560 | |
## -------------|-----------|-----------|-----------|
##
##
まとめ
デート本のロジスティック回帰分析での適合率1は\(LCOM \gt 0\)である場合は約\(83\%\)で、\(LCOM = 0\)の場合は約\(55\%\)でした。一方、k近傍法では\(LCOM\)を条件分けすることなく約\(82\%\)でした。ただし、バグがないと予測したにもかかわらずバグであるというものが出ていますので、k近傍法の予測結果だけで判断するとバグを流出させる可能性があります。また、k値をいくつに設定すべきなのかは難しいところがあります。ラベルが二種の場合にはタイがでない奇数をkの値にする方が好ましいので交差検証の際も奇数だけを指定してみるのも手かもしれません。
k近傍法は手間がかからずに相応の予測(分類)ができることを考えると判断材料の一つとして採用しても良いのではないかと考えます。
1 適合率:デート本ではバグありと予測されたモジュールの内、実際にバグのあった割合を適合率と呼んでいます。クロス集計表では“Predict(TRUE)/Actual(TRUE)”の上段の割合が適合率です。
可視化してみる
k近傍法は強力に見えますが、一体、どのようは判別処理を行っているのでしょう?可視化することで分類(予測)処理のイメージを把握してみましょう。
品種の分類(予測)
では、irisデータセットを用いて、テストデータがどの品種に該当するのかを分類してみます。irisデータセットはご存知のように三品種、各50、計150のインスタンスからなるデータセットです。その内、ランダムに抽出した145のインスタンスをトレーニングデータとして用います。
set.seed(2113)
trainset <- iris %>% dplyr::sample_n(size = 145) %>% dplyr::arrange(Species)
trainset %>%
  ggplot2::ggplot(ggplot2::aes(x = Sepal.Width, y = Sepal.Length,
                               colour = Species, shape = Species)) +
    ggplot2::geom_point() +
    ggplot2::scale_color_brewer(palette = "Dark2")
残る以下の5のインスタンスをテストデータとし各インスタンスがどの品種に分類されるのかをk近傍法を用いて計算します。
## Joining, by = c("Sepal.Length", "Sepal.Width", "Petal.Length", "Petal.Width", "Species")今回はkknn::kknn関数でトレーニングを行いテストデータの各インスタンスを分類します。なお、k値はデフォルト値を使っています。
##
## Call:
## kknn::kknn(formula = Species ~ ., train = trainset, test = testset,     k = 7)
##
## Response: "nominal"
##          fit prob.setosa prob.versicolor prob.virginica
## 1     setosa           1       0.0000000      0.0000000
## 2 versicolor           0       0.9843084      0.0156916
## 3  virginica           0       0.0000000      1.0000000
## 4  virginica           0       0.1257844      0.8742156
## 5  virginica           0       0.2580081      0.7419919
参考
class::knn関数を用いる場合は以下のように因子データを除いたデータを学習データ、テストデータとして渡す必要があります。
trainset
(testset <- (answer <- iris %>% dplyr::anti_join(trainset)))

predict <- class::knn(train = trainset[, -5], test = testset[, -5],
                      cl = trainset$Species, k = 7, prob = TRUE)
分類(予測)結果を可視化する
次に分類結果を可視化して確認してみます。ラベルは「正解/予測」の順に表記されています。
Sepal(萼片)

Petal(花弁)

架空のデータを分類してみる
次に以下の架空のデータを用いて分類してみます。##
## Call:
## kknn::kknn(formula = Species ~ ., train = trainset, test = testset[, -5])
##
## Response: "nominal"
## fit prob.setosa prob.versicolor prob.virginica
## 1 versicolor 0 1 0
## 2 versicolor 0 1 0
## 3 virginica 0 0 1
## 4 virginica 0 0 1
## 5 setosa 1 0 0
## 6 setosa 1 0 0
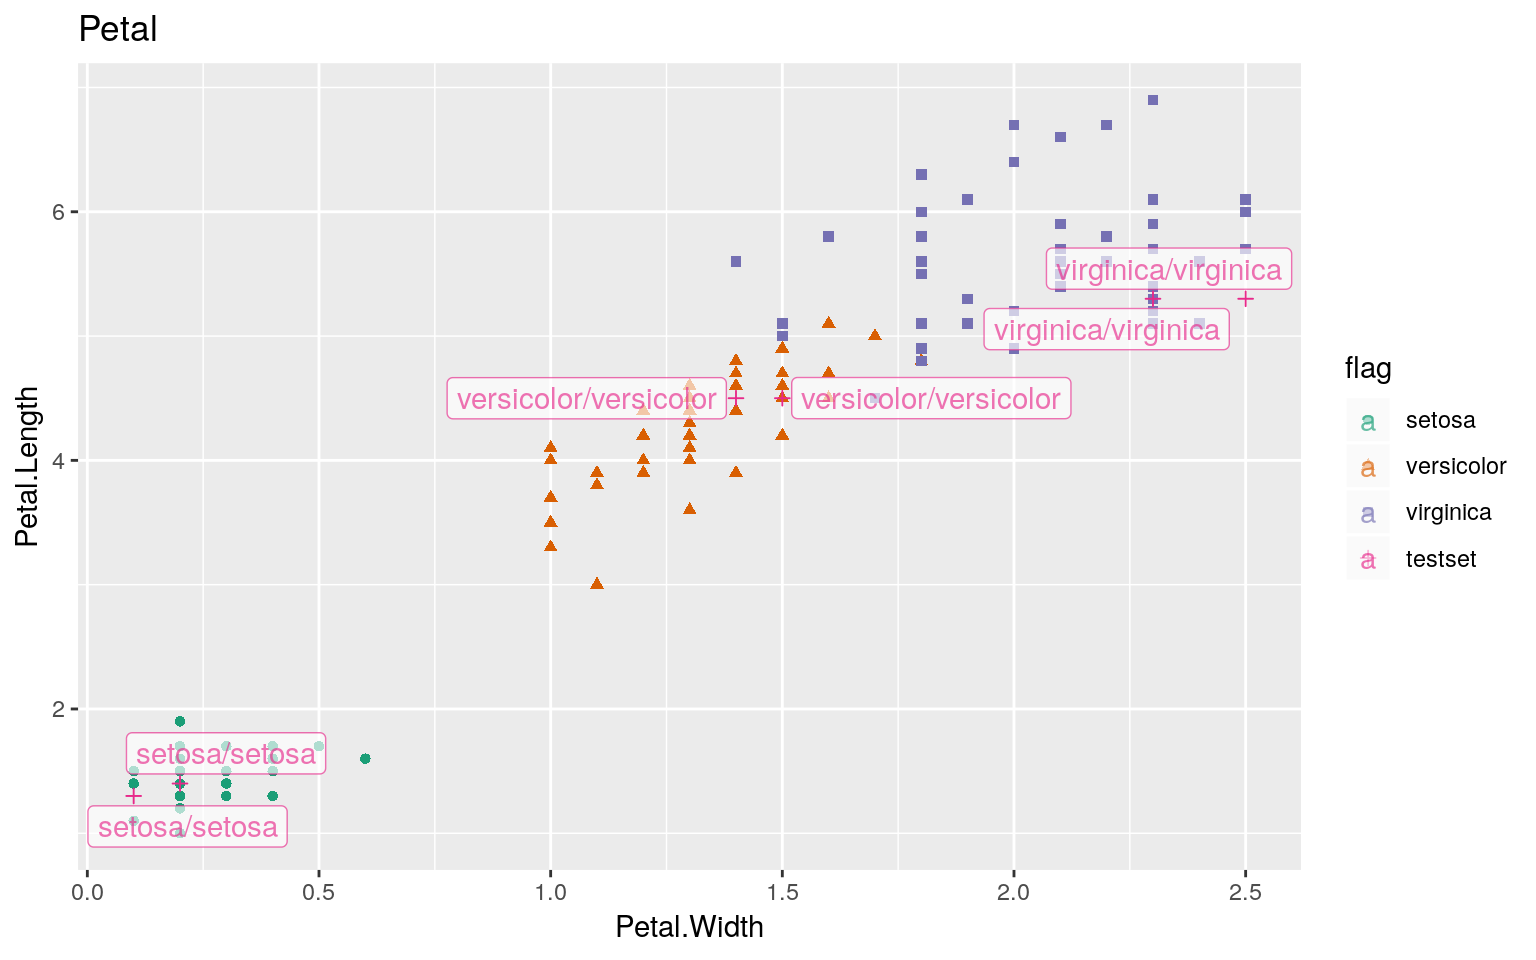
分類境界を可視化する
分割領域を可視化するには分割領域のメッシュ全体をテストデータとして用います。ただし、下記のコードでは可視化に用いるSepalのデータのみで学習を行っているので、Petalのデータも用いて分類した場合と結果が異なっていると考えてください。
set.seed(2113)
# 学習用データの作成
train_df <- iris %>%
  dplyr::sample_n(size = 145) %>%
  dplyr::arrange(Species)
# 学習用データの因子分類(ラベル)
cl <- train_df$Species

# テスト用データ(描画範囲の全グリッドデータ)の作成
train <- train_df %>%
  dplyr::select(Sepal.Length, Sepal.Width) %>% as.matrix()
test <- expand.grid(x = seq(min(train[, 1]), max(train[, 1]), by = 0.1),
                    y = seq(min(train[, 2]), max(train[, 2]), by = 0.1))

# 学習と予測
set.seed(2113)
classif <- class::knn(train, test, cl, k = 7, prob = TRUE)
prob <- attr(classif, "prob")

(df <- dplyr::bind_rows(
  dplyr::mutate(test, prob = prob, cls = "versicolor",
                prob_cls = ifelse(classif == cls, 1, 0)),
  dplyr::mutate(test, prob = prob, cls = "virginica",
                prob_cls = ifelse(classif == cls, 1, 0)),
  dplyr::mutate(test, prob = prob, cls = "setosa",
                prob_cls = ifelse(classif == cls, 1, 0)))) %>%
  ggplot2::ggplot() +
  # テスト用データの分類結果
    ggplot2::geom_point(ggplot2::aes(x = x, y = y, col = cls),
                        data = dplyr::mutate(test, cls = classif),
                        size = 0.1) +
  # 分類境界
    ggplot2::geom_contour(ggplot2::aes(x = x, y = y, z = prob_cls,
                                       group = cls, color = cls),
                          bins = 2, data = df, size = 0.25) +
  # トレーニング用データ
    ggplot2::geom_point(ggplot2::aes(x = x, y = y, col = cls, shape = cls),
                        data = data.frame(x = train[, 1],
                                          y = train[, 2], cls = cl),
                        size = 1.75) +
    ggplot2::scale_color_brewer(palette = "Dark2") +
    ggplot2::coord_flip() +
    ggplot2::labs(x = "Sepal.Length", y = "Sepal.Width",
                  colour = "Species", shape = "Species")
大きな点がトレーニングに用いたデータ、小さな点がテスト用データの分類結果になります。
k値を変えてみる
交差検証に基づく(汎化性能が高い)k値とデフォルト値を半分にしたk値で分類がどのように変わるかを見て見ます。
set.seed(2113)
cv <- caret::train(x = train, y = cl,
                   method = "knn", metric = "Accuracy",
                   tuneGrid = expand.grid(k = 1:30),
                   trControl = caret::trainControl(method = "cv"))

# 学習と予測
set.seed(2113)
classif <- class::knn(train, test, cl, k = cv$finalModel$k, prob = TRUE)
prob <- attr(classif, "prob")

g21 <- (df <- dplyr::bind_rows(
  dplyr::mutate(test, prob = prob, cls = "versicolor",
                prob_cls = ifelse(classif == cls, 1, 0)),
  dplyr::mutate(test, prob = prob, cls = "virginica",
                prob_cls = ifelse(classif == cls, 1, 0)),
  dplyr::mutate(test, prob = prob, cls = "setosa",
                prob_cls = ifelse(classif == cls, 1, 0)))) %>%
  ggplot2::ggplot() +
  # テスト用データの分類結果
    ggplot2::geom_point(ggplot2::aes(x = x, y = y, col = cls),
                        data = dplyr::mutate(test, cls = classif),
                        size = 0.1) +
  # 分類境界
    ggplot2::geom_contour(ggplot2::aes(x = x, y = y, z = prob_cls,
                                       group = cls, color = cls),
                          bins = 2, data = df, size = 0.25) +
  # トレーニング用データ
    ggplot2::geom_point(ggplot2::aes(x = x, y = y, col = cls, shape = cls),
                        data = data.frame(x = train[, 1],
                                          y = train[, 2], cls = cl),
                        size = 1.75) +
    ggplot2::scale_color_brewer(palette = "Dark2") +
    ggplot2::coord_flip() +
    ggplot2::labs(x = "Sepal.Length", y = "Sepal.Width",
                  colour = "Species", shape = "Species",
title = paste0("k = ", cv$finalModel$k))set.seed(2113)
# 学習と予測
set.seed(2113)
classif <- class::knn(train, test, cl, k = 3, prob = TRUE)
prob <- attr(classif, "prob")
g03 <- (df <- dplyr::bind_rows(
dplyr::mutate(test, prob = prob, cls = "versicolor",
prob_cls = ifelse(classif == cls, 1, 0)),
dplyr::mutate(test, prob = prob, cls = "virginica",
prob_cls = ifelse(classif == cls, 1, 0)),
dplyr::mutate(test, prob = prob, cls = "setosa",
prob_cls = ifelse(classif == cls, 1, 0)))) %>%
ggplot2::ggplot() +
# テスト用データの分類結果
ggplot2::geom_point(ggplot2::aes(x = x, y = y, col = cls),
data = dplyr::mutate(test, cls = classif),
size = 0.1) +
# 分類境界
ggplot2::geom_contour(ggplot2::aes(x = x, y = y, z = prob_cls,
group = cls, color = cls),
bins = 2, data = df, size = 0.25) +
# トレーニング用データ
ggplot2::geom_point(ggplot2::aes(x = x, y = y, col = cls, shape = cls),
data = data.frame(x = train[, 1],
y = train[, 2], cls = cl),
size = 1.75) +
ggplot2::scale_color_brewer(palette = "Dark2") +
ggplot2::coord_flip() +
ggplot2::labs(x = "Sepal.Length", y = "Sepal.Width",
colour = "Species", shape = "Species",
title = paste0("k = 3"))
k値が小さい方がテストデータに対して敏感(ピーキー、ハイゲイン)で、k値が大きい方がテストデータに対して鈍感(ロバスト)であることが分かります。未知のデータを考えるとあまり、ハイゲインにならないk値を選択すべきだと考えます。
分類過程を可視化する
最近傍法では分類結果のみが出力されるので、どの変量がどの程度、分類に寄与しているのかが分かりません。そこで、分類結果に対してどの変量がどの程度の寄与をしているか知るためのiBreakDownパッケージが便利です。
iBreakDown
iBreakDownパッケージはR-bloggersで2019年4月の注目パッケージとして取り上げられたパッケージの一つです。例えばcaret::knn3Train関数による分類結果は以下のようになりますが、この結果に対して各変量がどの程度寄与しているのかが分かりません。
set.seed(2113)
trainset <- iris %>%
  dplyr::sample_n(size = 145) %>%
  dplyr::arrange(Species)
testset <- iris %>%
  dplyr::anti_join(trainset)

caret::knn3Train(trainset[, -5], testset[, -5], cl = trainset[, 5], k = 7)
## [1] "setosa" "versicolor" "virginica" "virginica" "virginica"
## attr(,"prob")
## setosa versicolor virginica
## [1,] 1 0.0000000 0.0000000
## [2,] 0 1.0000000 0.0000000
## [3,] 0 0.1428571 0.8571429
## [4,] 0 0.1250000 0.8750000
## [5,] 0 0.2500000 0.7500000iBreakDownパッケージを用いると以下のように可視化することが可能になります。
knn3_model <- caret::knn3(Species ~ ., data = trainset, k = 7)

knn3_model %>%
  iBreakDown::local_attributions(data = testset[, -5],
                                 new_observation = testset[1, ]) %>%
  plot()
knn3_model %>%
  iBreakDown::local_attributions(data = testset[, -5],
                                 new_observation = testset[2, ]) %>%
  plot()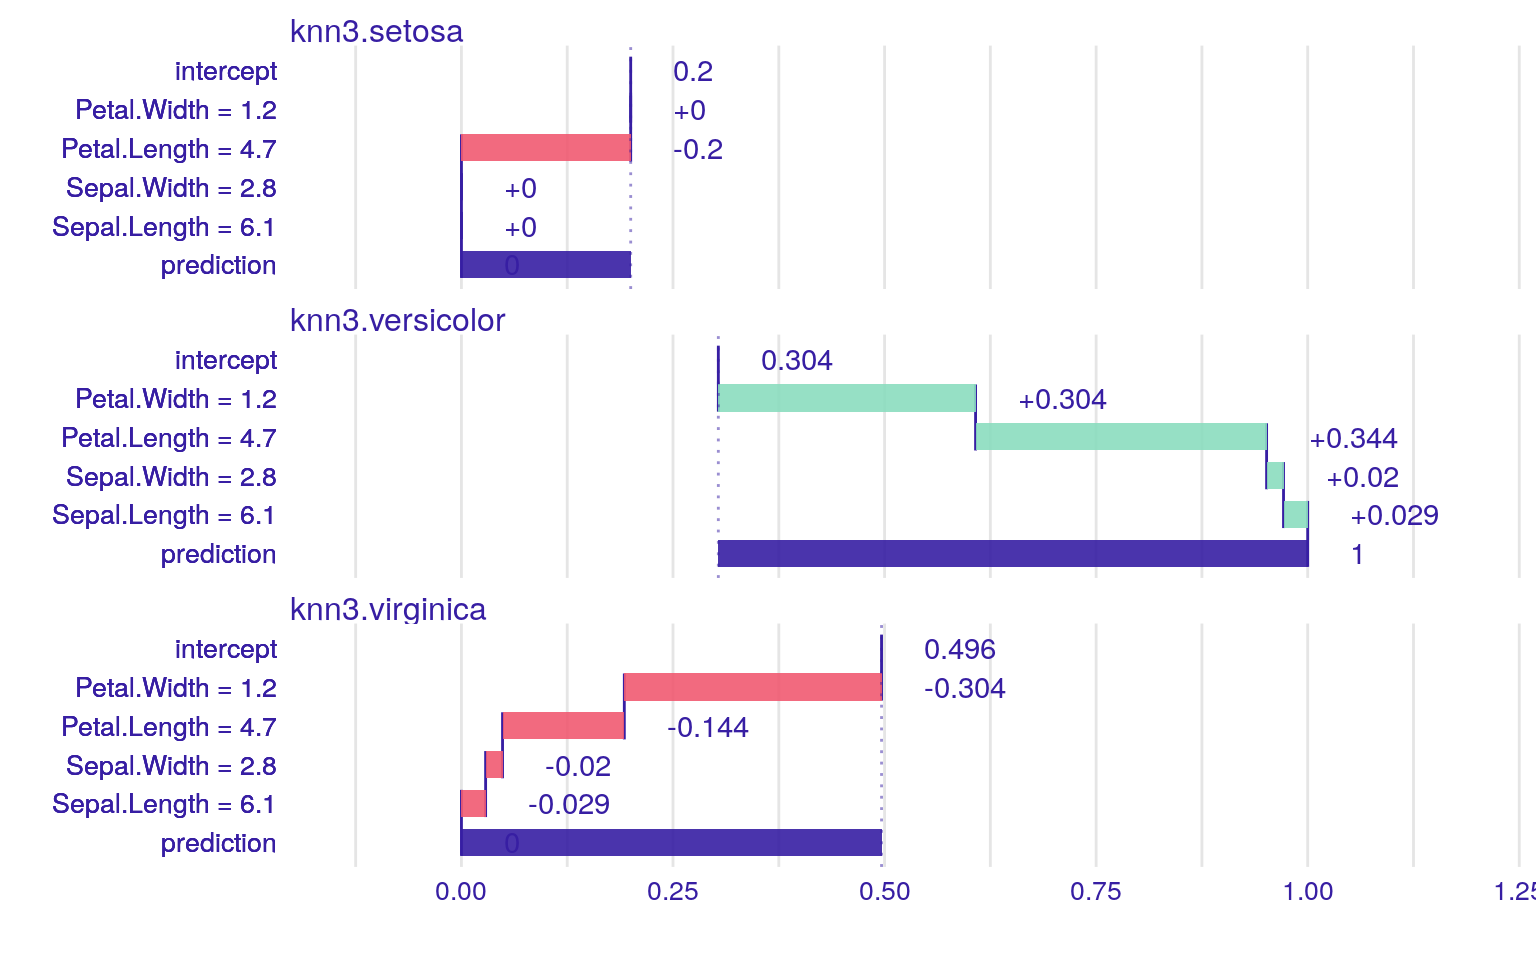
knn3_model %>%
  iBreakDown::local_attributions(data = testset[, -5],
                                 new_observation = testset[3, ]) %>%
  plot()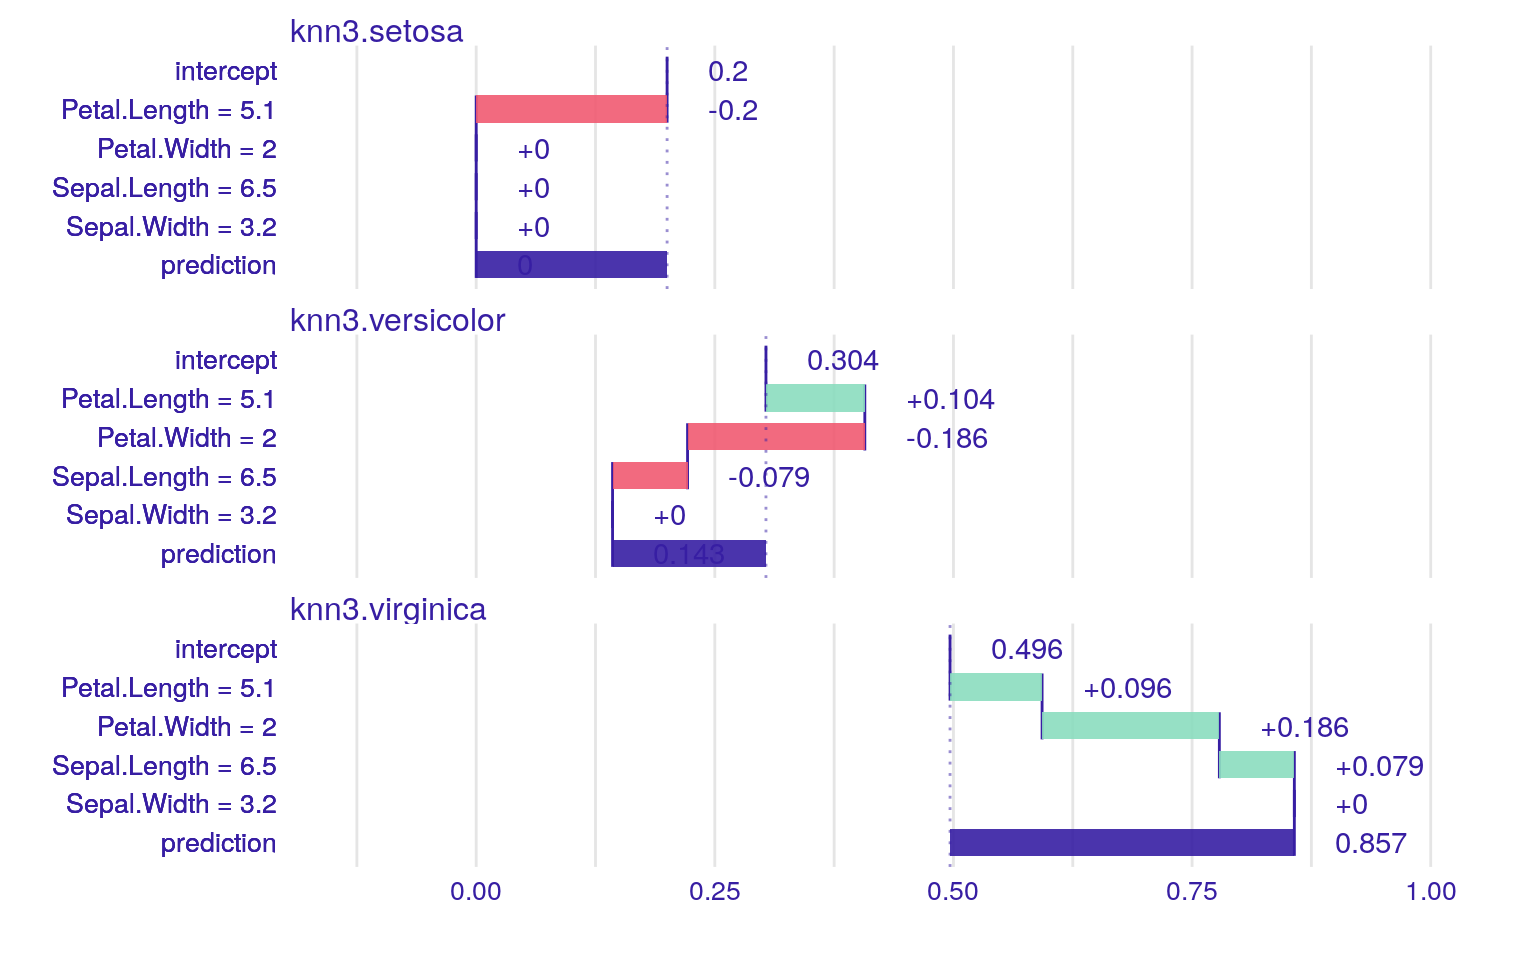
knn3_model %>%
  iBreakDown::local_attributions(data = testset[, -5],
                                 new_observation = testset[4, ]) %>%
  plot()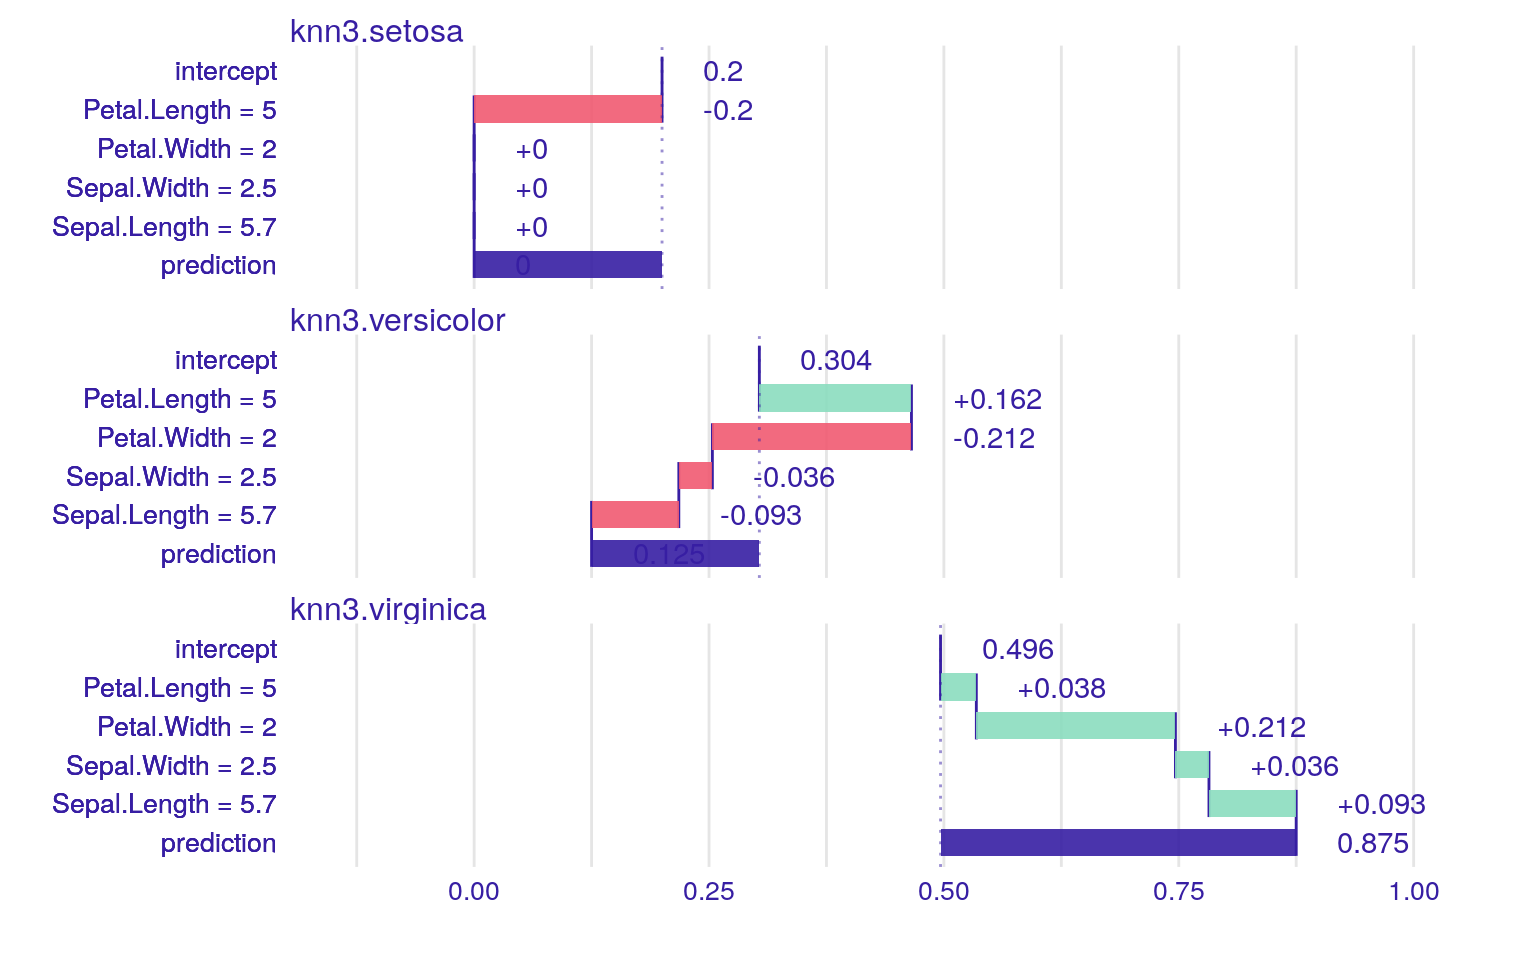
knn3_model %>%
  iBreakDown::local_attributions(data = testset[, -5],
                                 new_observation = testset[5, ]) %>%
  plot()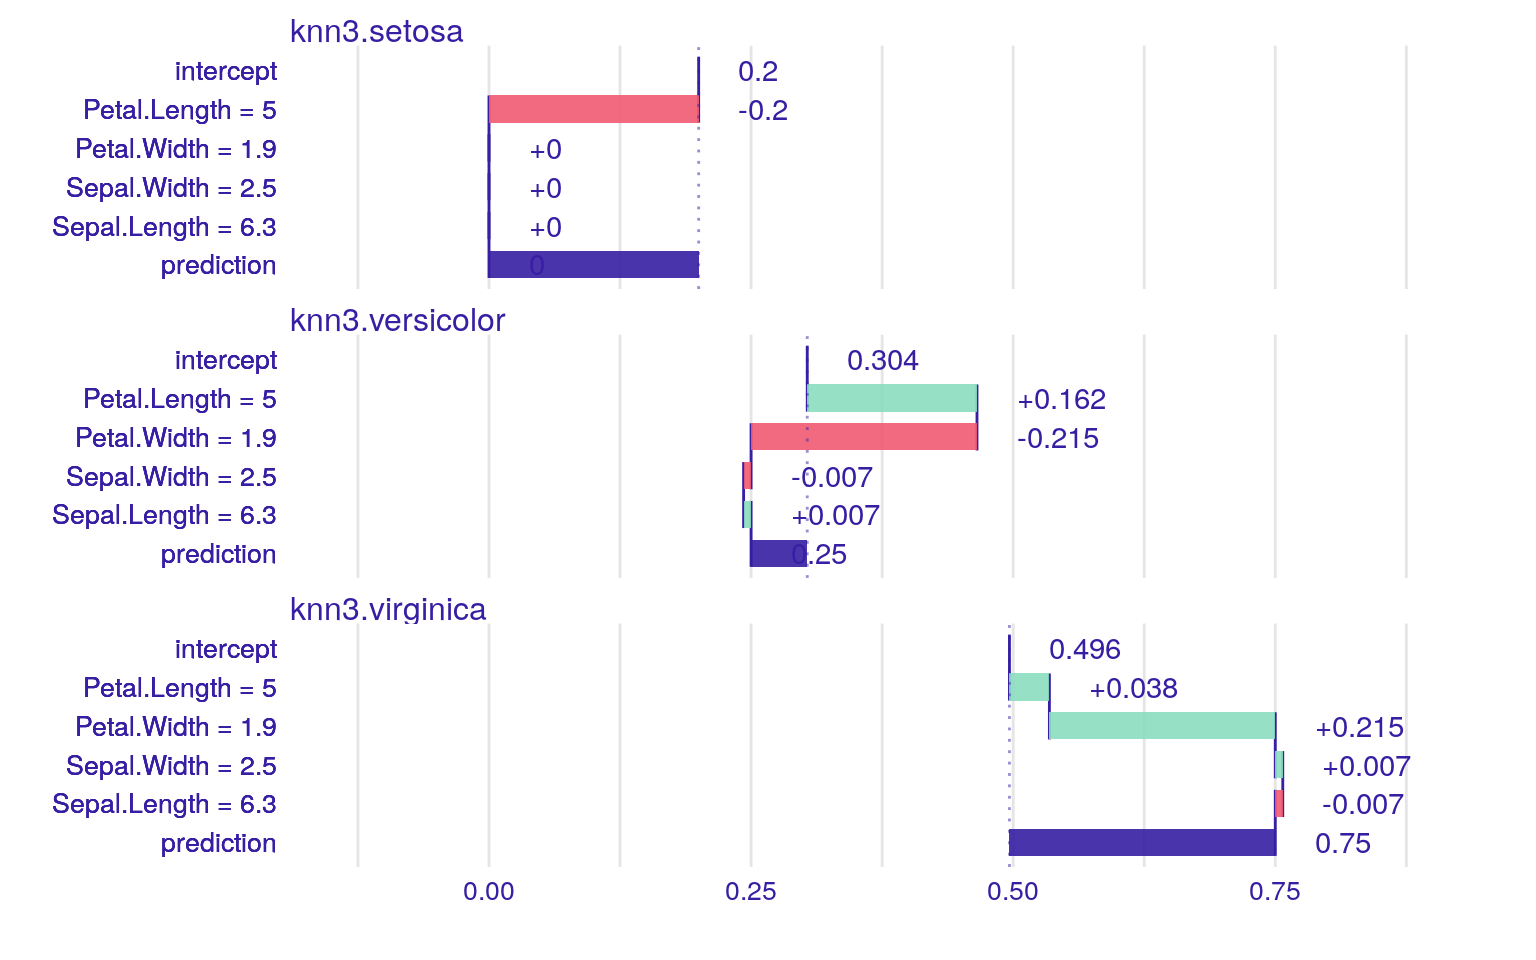
可視化すると面白いは面白いのですが、k近傍法におけるinterceptとは何を意味しているのでしょうか?可視化結果を見る限りcaret::knn3関数は他のk近傍法の関数の実装とは異なり単に多数決で決めているようには見えません。Rにおけるk近傍法の関数は様々なパッケージが提供していますので、その特徴を把握してから使った方が良さそうです。なお、iBreakDownパッケージはk-NN以外にSVMやrandomForest, glmなどの結果も可視化できる便利なパッケージです。
caret
caretパッケージにあるcaret::varImp関数を用いると分類の際に各変量の寄与具合を可視化するための情報を読み出すことができます。Petal(花弁)の情報は全ての品種の分類で使われている一方で、Sepal.Width(萼片の幅)は、virginicaを分類する際にはまったく使われていないことが読み取れます。
caret::train(trainset[, -5], trainset[, 5], method = "knn") %>%
  caret::varImp() %>%
  .$importance %>%
  tibble::rownames_to_column() %>%
  tidyr::gather(key = "key", value = "importance", -rowname) %>%
  ggplot2::ggplot(ggplot2::aes(x = importance, y = rowname,
                               colour = key, shape = key, size = key)) +
    ggplot2::geom_point(position = "dodge") +
    ggplot2::labs(y = "")
参考資料
- Lazy Learning - Classification Using Nearest Neighbors
- Assignment 6: Lazy Learning - Classification Using Nearest Neighbors
- Python と R の違い (k-NN 法による分類器)
- Variation on “How to plot decision boundary of a k-nearest neighbor classifier from Elements of Statistical Learning?”
- Chapter 3 Overview of Statistical Learning
- 機械学習(caret package)